Programs for recovering folders deleted from the recycle bin. How to recover files deleted from the recycle bin. Recovering deleted files from the recycle bin
In this article, you will learn:
- how to recover deleted files using the EaseUS Data Recovery Wizard;
- how to return the Cart back to the Desktop;
- how to restore a deleted folder to your hard drive;
- how to recover all deleted files from recycle bin area to computer.
When you delete a file through Explorer or another file manager, it is placed in a special staging area of Windows - the Recycle Bin. However, this area on the disk is present in any normal operating system with a graphical interface: Windows, Mac OS or Linux. The recycle bin (or recycle bin, as it is called) can be installed even on a mobile phone running Android or iOS.
In this guide, you will learn about 2 ways to get data back to your hard drive using popular resuscitators. EaseUS Data Recovery Wizard and Handy Recovery.
One way or another, deleted files are stored in the Trash for a certain time until one of two situations occurs:
- You are emptying the System Recycle Bin because there is no free space left on your hard drive
- The Recycle Bin uses limited space to store "erased" data. When there is not enough space, old files are simply overwritten with newer ones over existing information without the user's knowledge.
Thus, the Windows "trash can" plays the role of a kind of intermediate clipboard, reserve space on the HDD. If you decide that you still need some valuable files, you can "rummage" in the system Recycle Bin, dig out directories, folders, erased items from there, and quickly restore them. As a result, you get a file that seemed to be lost forever.
Sometimes you look in the Windows Recycle Bin - and there is nothing useful there: in fact, only useless "garbage"! Chances are, you just emptied the Windows System Recycle Bin and the valuable files are actually gone.
Well, we will look at ways to restore the Trash, later in the text.
How to recover files in the Trash
Before the worst happens, you still have a chance to restore, reanimate files from the destroyed directory, from the emptied Recycle Bin. The process of returning erased data is quite simple.
- To get started, you find a file or folder by going to the Trash
- Then find the deleted file or folder you are looking for
- Click on the element with the right mouse button, select the "Restore" option through the context menu.
Can I recover files deleted from the Trash?
From time to time, you can empty the Trash to free up disk space. But do you think that files cleaned in this way will be quite difficult to recover? To do this, you will already need special programs for recovering files, and not two clicks of the mouse. Therefore, I advise you to always think about what actions you perform, especially when it comes to cleaning up the Trash.
When a file is erased from the Recycle Bin, many users think that it is sent to / dev / null and it is impossible to recover deleted files in the future, even with the help of recovery programs. Even the Windows operating system displays a message saying, “Deleting a file from the" Recycle Bin "will permanently delete the file / folder from your computer”. However, in reality this is far from the case. I think that my article is also read by experienced users who do not believe what the operating system tells them and can do what is incomprehensible to mere mortals. So, listen to me carefully.
"Windows" (or another OS) changes one character in the file table, after which the file and folders are simply not displayed in Explorer, My Computer or another file manager. However, now we can get any program for recovering files using the functionality as intended. Basically, any resuscitation program from this category will be able to scan your hard drive and perform effective recovery of deleted files from the Recycle Bin. I will advise you a time-tested effective toolkit. First of all, we are talking about such a well-known utility as EaseUS Data Recovery Wizard.
How to Recover Trash or Deleted Folder Using EaseUS Data Recovery Wizard
Data Recovery Wizard is an excellent and effective program that has helped me more than once in finding files from the Recycle Bin. I used it under Windows, and in fact, it restored everything that I cleaned up because of my stupidity. One of the key features of this program is that you can quickly look at the files, that is, make a preview of them, before actually restoring them. This can save you a lot of time, especially if there were a lot of files in the Recycle Bin and they all ended up, as they say, under distribution. Next, read my guide on how to get back erased files from the Trash using the EaseUS Data Recovery Wizard.
Step 1. Download Data Recovery Wizard
You can download the program in the catalog on this site, on torrents or, of course, on the website of the Recovery Wizard manufacturer. Only there it is paid; but if there is a little money, then why not support the guys who made a good recovery program? The free version will work too, so feel free to download it.
Step 2. Launching the program
Run EaseUS Data Recovery Wizard, select the types of deleted files you want to recover from the recycle bin. Then click “Next” to continue the procedure for restoring files and folders in the next step.
Step 3. Selecting a disk
Select the drive, partition of the hard drive where you lost the file, click the "Scan" button. The program will quickly scan the selected source in search of files deleted from the Recycle Bin (everything here depends on the size of the source; please be patient). By the way, if you have erased an entire section of a disk, you can use the software option “Find Lost Disks”. Then click “Scan” and wait.
Selecting a disc with erased files and folders
Step 4. Recovering deleted files and saving the received data to disk
After scanning, you can preview the desired deleted files in the Recycle Bin for recovery and then select one or many items to save to disk.
Tip of the day... I strongly advise you to save files and directories NOT on the disk where the files for resurrection from the Recycle Bin are located. Copy them to another section: this will avoid overwriting data, which, in fact, is still at the recovery stage (and it is not a fact that it will turn out well - although let's not talk about sad things). It is very easy to mistakenly erase information needed for reconstruction.
Application EaseUS Data Recovery Wizard: who seeks will always find
I hope this lesson helped one of the readers answer an internal question: "How to recover deleted files or folders from the Recycle Bin": photos of kittens, favorite movies about love, or an abstract on finding deleted files in the Recycle Bin.
I should tell you that there are a bunch of other ways to get deleted files back from the Trash. As a last resort, if the EaseUS Data Recovery Wizard did not help you, try any recovery program from the one I compiled specifically for visitors to the Softdroid.net website. Take a look at other sections of the site: I have already repeatedly told you how to restore the Trash.
How to recover files deleted from the Recycle Bin using the Handy Recovery utility
If you have emptied the Recycle Bin or deleted several files from it, then you still have the opportunity to get those "thrown into the trash" files back. To do this, follow a few simple steps in the Handy Recovery application.
Handy Recovery will help you learn how to get back deleted folders and files from the Trash in Windows
When choosing a drive, select the one that contained the files before they were moved to the Windows Recycle Bin. Explorer will display only the system Recycle Bin, but in fact files that have been moved from another drive are stored in different system directories. That is why it is so important to specify the correct drive for data recovery from the Recycle Bin.
Once you have selected the drive you want, click the Analyze button. Upon completion, select the "Recycle Bin" folder in the appeared Handy Recovery window. It contains files and folders that you can recover deleted files in the usual way using the "Recover" button on the toolbar or a similar reconstruction command from the context menu. You can restore a deleted folder in the same way as a file.
If you do not see files in the specified directory, you can go to the advanced analysis of the hard disk file system in Handy Recovery.
Let's go further. If you still do not find the items you are looking for after an advanced analysis, try looking for files in the system folder belonging to the Trash. The folder name depends on the OS and the theme of the disk file system. For example, for Windows 2000 and XP, the folder is named "$ RECYCLE.BIN".
Advice: even if the deleted file is located inside these folders, not matching its original name, try to identify it by its extension (it always remains), size, or its internals (which can be found out through the preview).


If, while tidying up your computer and cleaning folders with documents, you accidentally deleted the file you need, do not panic right away. You can recover a lost document without any problems. In particular, if you just sent it to the trash (it is into it by default that all unnecessary files are dumped), in order to return the loss, you need to open the computer trash. To do this, you must first double-click on the shortcut on the desktop, and find the required document.
For a more convenient search, you can customize the view that is most preferable for you. To do this, hover the mouse cursor over an empty field in the basket, right-click and in the "View" section, select one of the options: huge icons, large icons, regular icons, list, table, tile, content. Find the lost document and hover over it. Select the file and right-click on it, then select the "Restore" option in the drop-down window.
Before that, to make it easier to find the document, select it and press the right button, then select the "Properties" section in the drop-down window and go to it. The window that opens will provide the necessary information about this file: type, size, source, time of creation and deletion. You need to carefully study the item "Source". The file will be sent to this folder after recovery. For the convenience of finding it later, you can use the file and folder search function, which is launched using the "Start" button on the desktop.
Recuva will help out
The above method helps to recover files stored in the recycle bin. However, if you have already cleaned it up? In this case, the problem can also be solved, but for this you need to install a special program on the computer. For example, it copes very well with the task of detecting deleted ones, as well as a small (about 4 MB), but very productive program Recuva. Install it on your computer and it will help you out in difficult times.
Run the program, click Next. Then, in the window that opens, select the type of file (all, video, pictures, documents, compressed, e-mail) that you want to recover, click "Next" and specify the location of the file. In this case, you need to check the item "Basket".
Then select "Next" again and in the new window click the "Start" button. In the same window, check the box "Enable advanced analysis" for better file search. Wait until the end of the process, then in the list of recovered files (it will open in a new window), mark one or more files and click the “Recover” button, remembering to specify the destination folder for the files found by the program. It is desirable. So that it is located on the D drive or any other, but not on where the "Trash" is located.
You can also use other applications to recover deleted files, among them Undelete PLUS, Easy Recovery and others have proven themselves well.
greetings to all Khabrovchan!
Imagine a situation that at one point your hard disk / flash drive / memory card stops working normally and you cannot access the data in the usual way. For those who do not make backups, this is a difficult and nervous time. In a panic, people start looking for data recovery programs and find them. Most of them are free, which cannot but please a person in our difficult time. But are all freeware programs so effective in recovering data? We ran a couple of tests on several popular programs, and here's what we got.
Attention! Lots of screenshots.
Briefly about the tests
To carry out the tests, we took five absolutely identical Transcend JetFlash 370 flash drives with a capacity of 8 GB. They were all bought on the same day in one place, the file system is the same, the main components (controller, memory chip) are also the same. Five absolutely identical flash drives. We recorded data on each of the flash drives. The choice fell on photos / pictures in .jpg format. The choice on the photo was not accidental: the description of some tested programs indicated that “special” algorithms would work when restoring photos. Also, in most cases, photographs are stored on memory cards, and our tests will be useful for novice and professional photographers.
The directory structure was as follows:

The total number of files is 1671

All data takes up a little less than a quarter of the free disk space

All programs were installed on one computer. OC Windows 7 Professional x64. The programs were tested one by one in turn. For each program, there was a separate drive with a simulated problem.

Test one. File system crash.
The first, fairly common situation, is a file system failure. With such a failure, as a rule, the drive asks for formatting. We simulated this situation as follows: on each drive, we wiped everything up to the beginning of the FAT tables

We deliberately left the FAT tables untouched, because some of the programs indicated the ability to analyze the found FAT tables. It is clear that when connected to a computer, a window immediately appeared asking you to format the disk.
1. Recuva
Recuva has a built-in wizard to guide the user to properly start the data recovery process 

Choosing our drive

We turn on the "In-depth analysis". It's not entirely clear what it is, but we are doing our best to get our data back.

And then we get the following message:

Advanced mode didn't help. The program didn't even start looking for our files.
Test failed. Recovery result - 0.
This program also has a wizard, but a slightly different kind

Selecting the second item, we get the following window:

It is obvious. After all, we ground the real data with zeros.
The next window shows which damaged partitions are available for scanning

We select it, and the following window appears

The default parameters are those that provide a search throughout the drive: from the minimum to the maximum value.
By applying these parameters in the window with logical disks, we get several new lines in the program.
Selecting each of the last three and pressing the "Preview" button, we find the section we need:

We open it and see the complete directory structure
All data opens correctly, all files and directories are in place.
The test is passed. Result 99%... (I don't like absolute values)
3. Pandora Recovery
The only program that requires an internet connection during installation.
There is also a master

But everything ends quickly when we try to choose the device we need.

Test failed. The recovery result is 0.
4. RS FAT Recovery
This program, like others, has a wizard who will definitely help with the work.

Choosing the maximum allowed search

After starting the search, a window appears with a progress bar, which helps guide the user along the recovery process

As a result, we get the complete directory structure, if not for one BUT

To save the data in its original form, registration of the program is required. Otherwise, each photo will have a background with a message about the unregistered version of the program.
However, the test passed successfully. The recovery result is 99%.
Perhaps the only program in which there is no master. Minus is small, because a simple search in a few clicks the user will find the desired button

By pressing the "Open" key, we automatically get a full-fledged result, if not for one BUT

The free version of the program has a limit on saving recovered data. It is 1024 MB. There is no preview, which is not very convenient. But the test passed. The recovery result is 99%.
Subtotals
Only three out of five programs completed the task. It:
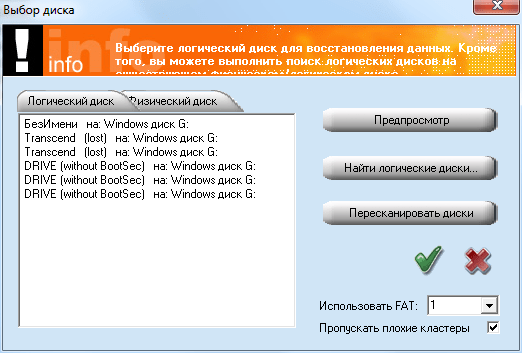
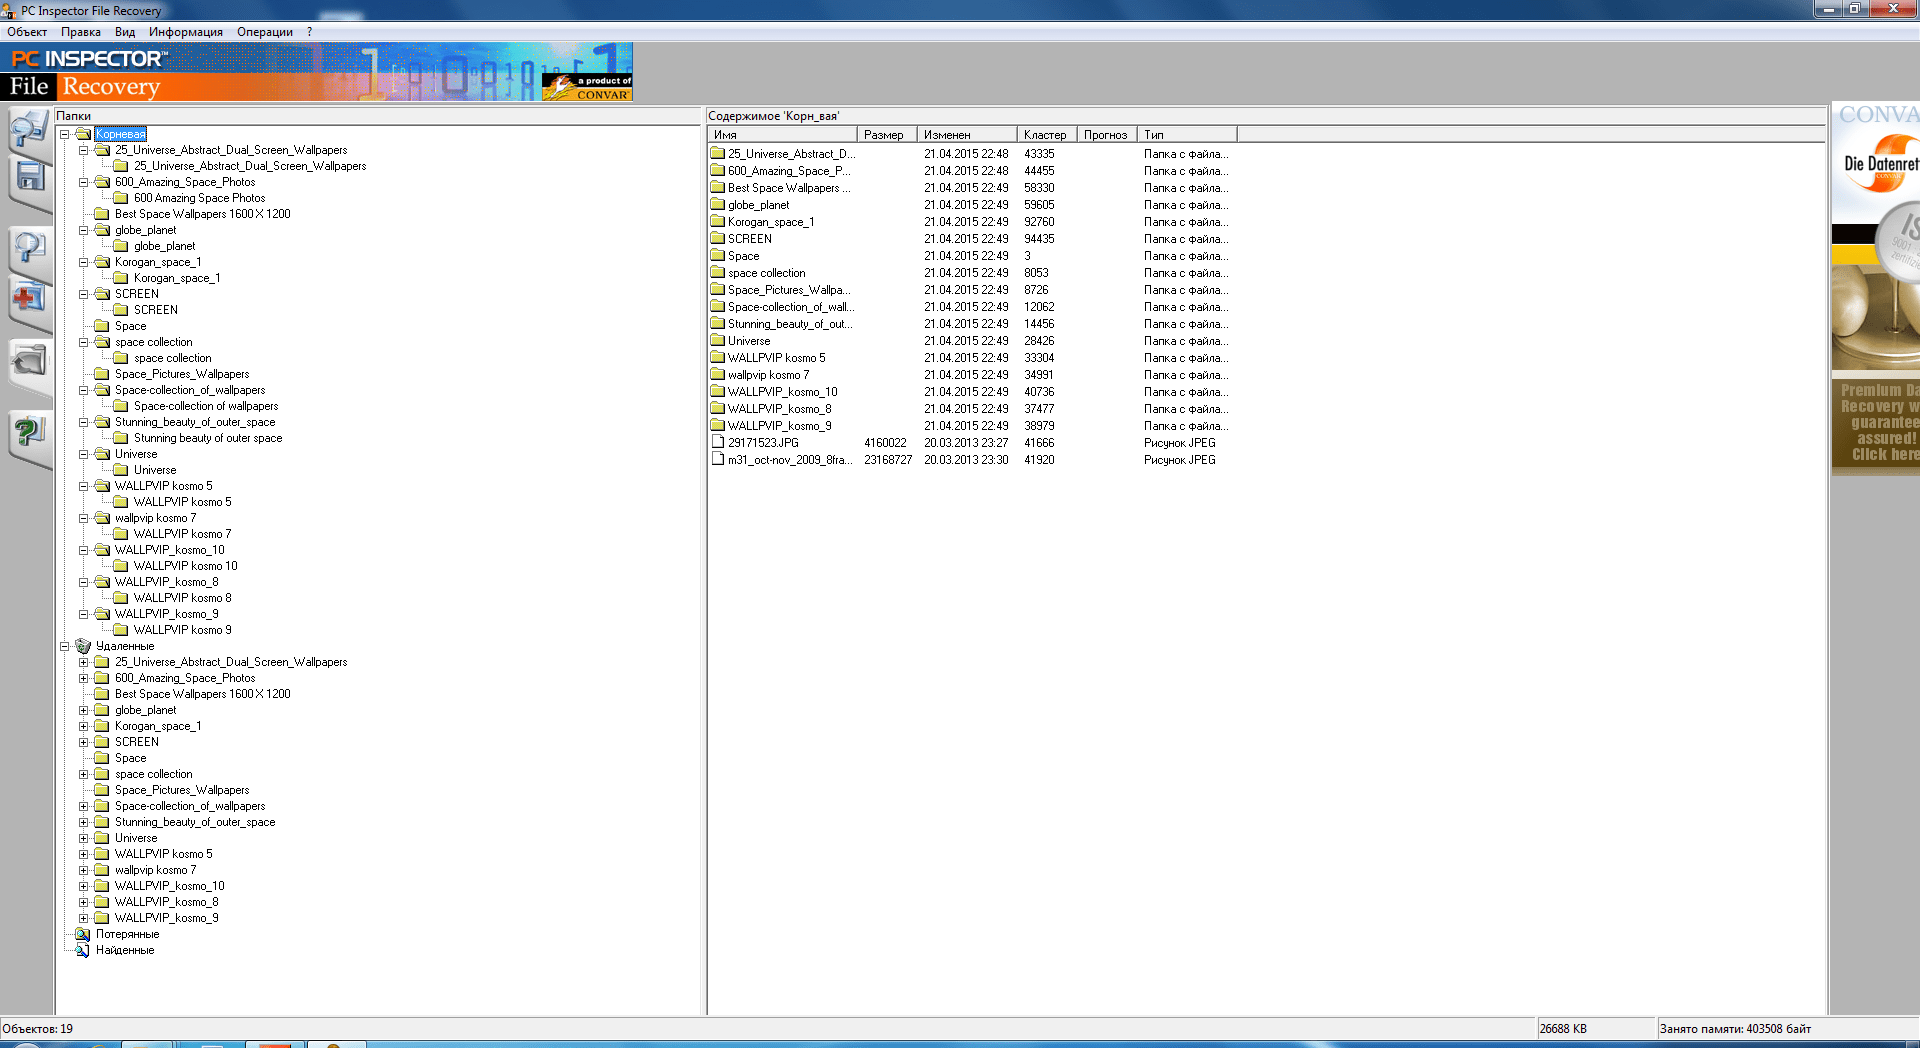
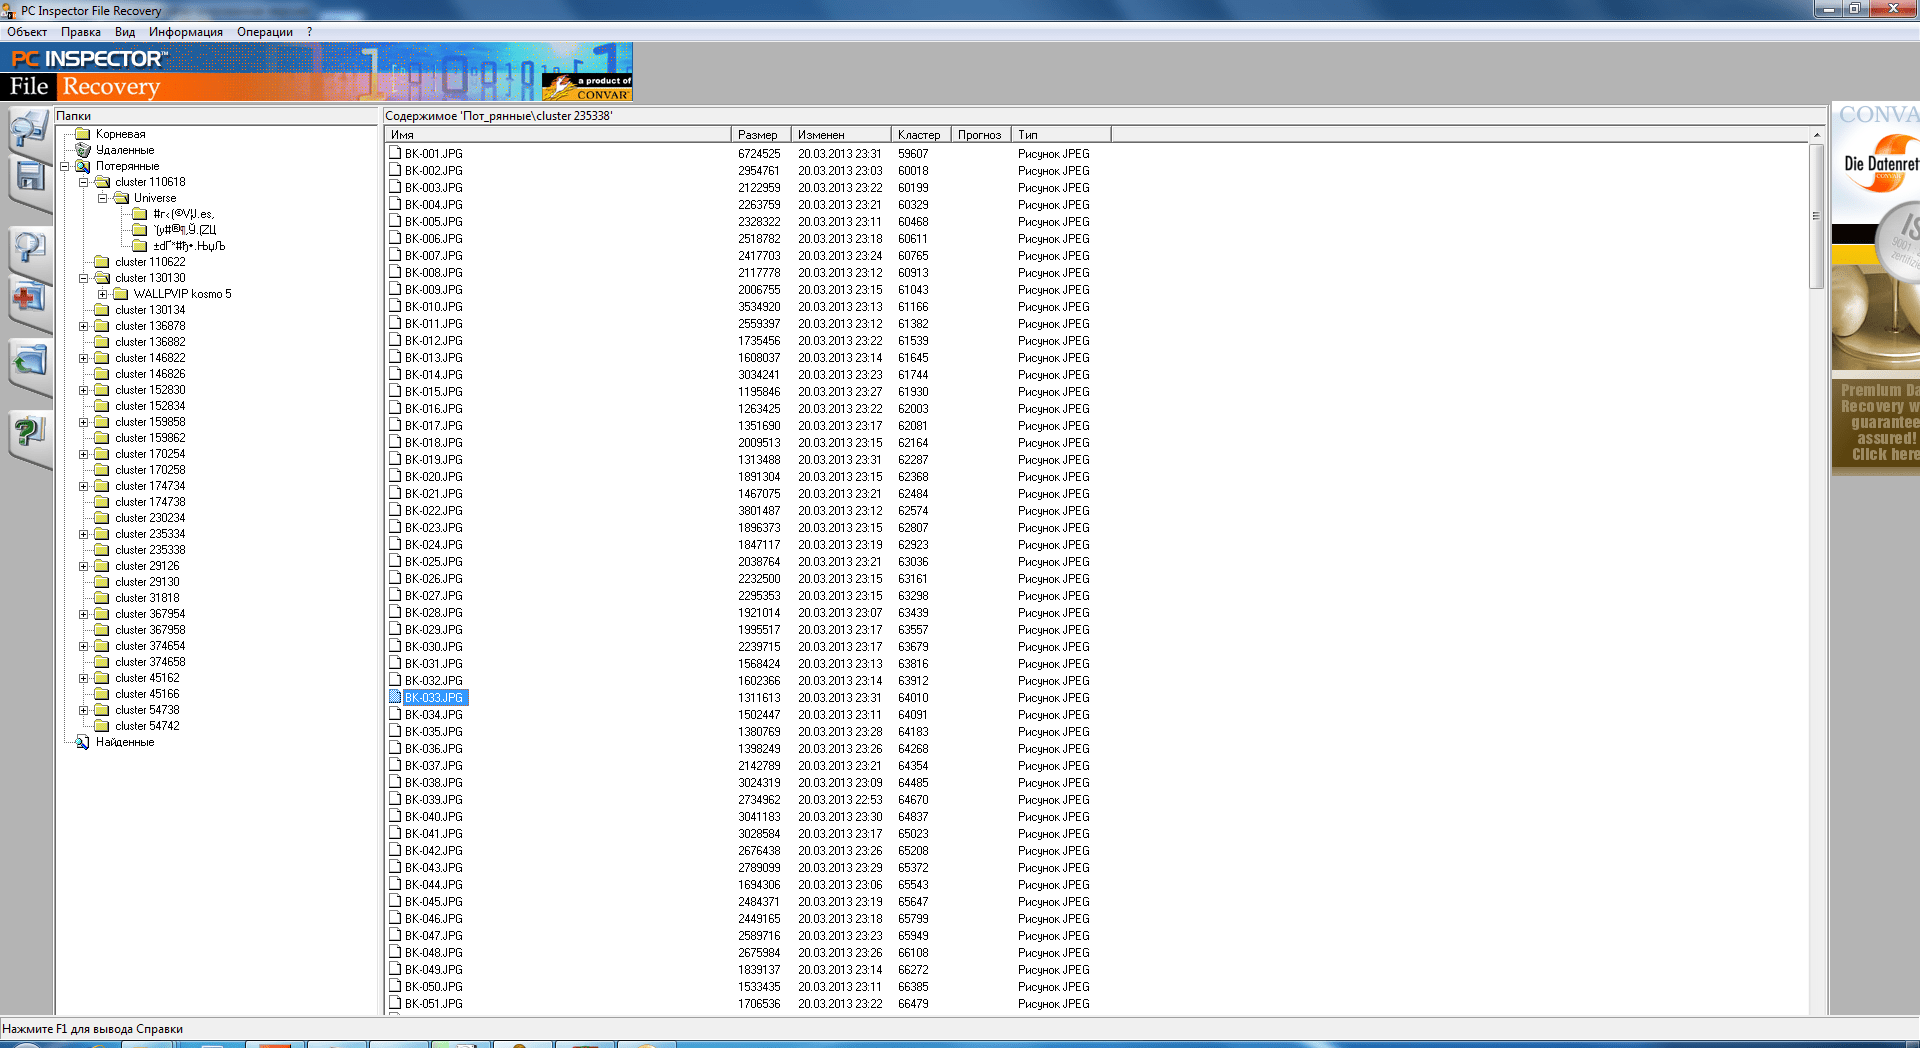
2. PC INSPECTOR File Recovery
4. RS FAT Recovery
5. MiniTool Power Data Recovery
At the same time, the program won an absolute victory. 2. PC INSPECTOR File Recovery, because in the free version it allows you to get a good result without restrictions and unnecessary actions.
Second test. Quick format
Now let's try to put ourselves in the place of a person who does not know what formatting is or simply presses the Enter key in any incomprehensible situation until the incomprehensible windows disappear. The windows disappeared, as did the data itself. By default, Windows uses Quick Format.

We also formatted the drives and ran each program again. Let me remind you that before that 1671 jpeg photos and pictures were recorded on the drives.
1. Recuva
This time, using the wizard, we launched the program without any problems, and the scanning process began

After a while, the result was obtained - 1390 whole files.

2. PC INSPECTOR File Recovery
Search was launched with default parameters

The result was obtained, but a detailed analysis showed that most of the files were damaged, only a few files with a minimum size were intact.
3. Pandora Recovery
Like Recuva, Pandora Recovery started without problems. Search for lost data has started

But at some point, an error occurs. Tried various startup options (both from admin, compatibility mode, etc.) but the error persists. From the preview you can see that real files were found, but there is no way to save them.

The test is considered to have failed. The recovery result is 0%.
4. RS FAT Recovery
In this program, using the wizard, we launched a search for our files.

We got the result: 1575 whole.jpg photos and 92 .bmp. A total of 1667 files.

5. MiniTool Power Data Recovery
In this program, as in others, the scanning process was launched.

The program reported that it found 1668 files.

We could not verify this. Let me remind you that in the free version it is only possible to save 1024 MB of recovered data. Having saved ten photographs, they found that they were all intact. We will conditionally consider the test passed, and recovery result - 99%.
Outcome
In the second test, the leadership, in my opinion, belongs to 1. Recuva... The general picture looks like this:

Based on the results of two tests, the best free data recovery software cannot be unequivocally determined. For each type of problem, you need to use a particular program. Nevertheless, data in case of "logical" problems can be recovered with the help of such free programs. By the way, after formatting, we wrote another 2 GB of new data on these flash drives, and
Every computer user is obliged to know how to recover deleted files from the recycle bin.
When you empty the trash can, you can erase documents that were accidentally deleted, seemingly forever. Can they be saved?
The decisive factor in the success of this business is time. The less time has elapsed since deletion by emptying the recycle bin, the more likely the restore operation will be successful.
What happens when a user empties the trash, thereby permanently deleting a folder or individual document? Let's look at the deletion algorithm that will help you understand how to recover files from the emptied recycle bin.
The hard disk contains a special section that stores information about files and folders. It has a backup in case the partition gets damaged. Let's compare it with a school magazine, in which the names of students are inscribed. If necessary, the teacher turns to him to call the child to the blackboard, and the operating system also uses this section for quick access to information.
The information itself is stored on a separate logical partition. In the Windows operating system, when data is deleted from the Recycle Bin, it is marked as deleted in the file and folder information section. But the data about them and the files themselves remain intact. In the same way, the teacher puts the letter "n" in front of the surname of the student who is absent. At the same time, both the student and information about him remain.
Thanks to such a deletion system, it remains possible to recover deleted files from the recycle bin, provided that an important condition is met: nothing new can be written to the disk. When new information is recorded, it can replace data marked as deleted. Then the likelihood of a successful recovery is significantly reduced.
The faster you start data recovery, the higher the probability of success.
Any program for recovering deleted files takes into account this algorithm. If no new data has been written to the disk (files marked for deletion have not been overwritten), the program accesses the section with information about folders and removes the mark for deletion.
There are many recovery programs, from simple to professional, used in service centers. Consider working with one of the most convenient and shareware - Recuva, from the famous British company Piriform Limited.
Recovery using the Recuva program
First, download the program from the official website. The free version is sufficient for our needs. It is installed without difficulty.
Tip: download programs only from official sites, if available. This ensures that the distribution is free of viruses.
Now let's look at how to restore a file from the trash in steps.
Let's simulate the situation. While working, the user accidentally deleted the photo. Its original is not left on the camera. Then he emptied the trash. Literally immediately after emptying the trash can, the loss was discovered, and it is required to restore the deleted photo.
Step 1. Search. Before you can restore what was deleted from the trash, you need to find what we deleted. To do this, right-click on the trash can icon and select the "Search for deleted files" menu item (Fig. 1). Now the Recuva program starts the analysis and looks for the deleted information. The process will take some time.
Step 2. Choice. In the program window that opens, we see a list of data that has been deleted recently. The green circle next to the name indicates a high probability of successful recovery. Red is low.
To make it easier to search for a particular photograph, select the "Graphics" item in the upper right corner using the filter. Now you can search for the desired photo from the remaining list, which shows the files from the basket. Having found the desired photo, mark it with a tick and click "Restore" (Fig. 2).
Step 3. Recovery. Now we choose the path where the data will be restored. It is better to create a separate folder on a different drive than the one on which the deleted photo was stored. In this case, the likelihood of a successful recovery process increases (Fig. 3).
At the end, we will see a message stating that the file recovery was successful, and we will be able to view the photo.
With this program, you can recover files that were not only deleted from the recycle bin, but also destroyed using the "Shift + Del" combination.
Windows to help
Windows has a System Restore feature. If you have it active, you can use it to restore files (but only if they were located on the system drive).
For example, you can select the "Desktop" folder in the "Explorer" folder and, by right-clicking on it, select the "Restore previous version" menu item.
After selecting a saved copy of this folder for a certain period, you can click on the "Restore" button. In this case, all objects of the "Desktop" folder that existed at that time will be restored (Fig. 4).
Summarizing
So, there are 2 points that will help you successfully recover files that were recently deleted from the recycle bin:
- Act as soon as possible.
- Use special programs such as Recuva.
Now you know how to recover data, but it will be good if these tips are not useful to you. Before emptying the trash, check to see if there is anything useful.
Who among the users has not encountered the problem of accidentally deleting the contents of the "Trash" by emptying? The problem is that it could contain important information. It is very easy to return a file or folder from the "Recycle Bin" to the initial location (everyone knows this). But how to recover files deleted from the "Recycle Bin"? Further, it is proposed to consider a few simple solutions that will be useful not only for the situation described, but will also help if the hard disk or removable media has undergone formatting.
Can I recover files deleted from the "Recycle Bin"?
Indeed, many users are interested in the issues of the possibility of recovering deleted objects. Basically, the "Recycle Bin" is a temporary storage where files and directories are placed after deletion.
But in reality, they are not physically deleted, but moved to a specially designated, reserved space on the hard disk. This is what is called the "Basket". That is, the file is safe and sound on the disk and does not go anywhere. However, in order to understand how to recover files deleted from the "Recycle Bin", you need to find out what happens after cleaning this storage.
Note: recovery can be performed by rolling back the system to a previous state, but more radical methods are offered for consideration, since this method does not always work at the level of user files.
The simplest principles of recovering deleted objects
As it turns out, everything is simple here, but many users do not know about it.

The fact is that even after deleting objects from the "Recycle Bin" they do not disappear from the hard disk either, but simply become invisible (unreadable) in the file system. This is akin to setting the status to Hidden for objects. In Explorer, such files and folders are not visible, but this does not mean that they are not on the hard disk. In this case, unreadability or hiding of objects deleted from the "Recycle Bin" is achieved by renaming them, when the first character in the name of a file or directory is changed to a "$" sign, after which the system simply ignores them. Most of the well-known data recovery programs use this principle by finding objects with such names.
It is believed that files deleted from the "Recycle Bin" can be restored after cleaning only if the sector in which the information about the initial object was stored was not overwritten, that is, new files were not saved over the old files. One can disagree with this, since today you can find programs that restore deleted objects even after formatting. By the way, there are no problems with fast formatting, but, according to most experts, it is impossible to recover information after full formatting. And this statement is doubtful. Further, it will be clear why.
How to recover files deleted from the "Recycle Bin" in Windows using the simplest programs
Enough theory. Let's get down to practical steps. So, how to recover files deleted from the "Recycle Bin"? Alas, there are no such tools in Windows operating systems, so you will have to use third-party software development. Please note that the applications intended for data recovery are absolutely inadequate.

For an ordinary user, a simple utility called Recuva is enough, in which you can set a search by types of deleted objects. But it is advisable to use it immediately after cleaning the system storage ("Recycle Bin"). Otherwise, the program may find deleted objects, but it will not be able to restore them, marking them as unsuitable for such actions due, for example, to a violation of integrity. However, you can use other applications as well.
Formatting storage media: data recovery
Now let's see how to recover files deleted from the "Recycle Bin" or perform similar procedures after formatting a disk or removable media. Utilities like Undelete or Unformat are fine here. But, in order not to test each application, it is better to immediately use the small utility R.Saver or the most powerful program R-Studio. The first is a light modification and can be used by untrained users.

The second is designed for professionals, since it is capable of recovering not only deleted objects after performing actions to completely format any data storage device, but can also completely recreate the file structure that was previously available on the media.