Virtual machines. Why is there no x64 selection in VirtualBox? Virtualbox for windows 7 download Russian version
Hello everyone Let's talk today about a not very pleasant jamb that you may have if you decide to use the VirtualBox virtual machine. The problem is that you cannot install 64-bit Windows. That is, when creating a virtual machine, you do not have a choice of 64-bit Windows, only 32-bit.
I also had such a jamb, but it was a long time ago, about four years ago, then I still had an ancient Pentium 4 processor. I loved my Penk and didn’t get off him for a long time ..
Let me remind you that we are talking about the fact that in this VurtualBox menu there is no item for installing Windows 64-bit:

So, why is there no x64 option in VirtualBox? The first option is the most banal, this is that your processor does not support virtualization technology. Almost all modern processors have it, both Intel and AMD. Even old processors have it, but not all of them, for example, it is not in the Pentium 4 family (only in 662/672 models). But for Pentium D and higher, there is already virtualization in almost all processes. I can’t say anything about AMD, but I think that the picture is about the same.
In any case, the new processors have virtualization. If you don't, then you either have an old processor or some rare or special beast.
But how do you know if your processor supports virtualization or not? Of course, it's best to just look at it, and then search the Internet for information about the process. You can also download the CPU-Z utility and it will show you the info, for example, I have Pentium processor G3220, here's what info the CPU-Z program shows about it:

You see, there is such a thing as Instructions, there is a list of instructions that the processor supports. True, there is one point here, each processor company has virtualization technologies called differently. Here, Intel has VT-x (if there is VT-d, then it's even cooler), but AMD's technology is called AMD-V. For example, here is info about the AMD FX-8350 processor, and here it is also indicated that the processor supports AMD-V technology:

By the way, I really like this AMD FX-8350 processor, it is not so expensive, it seems to be somewhere in half as much as the Core i7. But in terms of power, it’s clear that it loses to i7, although the FX-8350 has 8 cores, and the i7 has only 4. But as for me, the advantage of the AMD FX-8350 is that it has 8 cores, that is, where it is needed multi-threaded, then the FX-8350 may or may not be more efficient, I don't know for sure ..
Well, they seem to have figured it out. That is, to check the processor whether it has virtualization or not, then the fastest way is for you to download the CPU-Z utility (it is very simple and does not load the computer) and quickly look in it. And then if you need info about the process, then you run CPU-Z and there is all the main info there!
By the way, not everyone knows, but VirtualBox works without virtualization. I'm not sure, but I know for sure that VirtualBox used to have built-in software virtualization, whether it is now, I don't know. However, I personally did not notice the effect of it: without virtualization technology, the virtual machine works with brakes and this is completely uncomfortable.
There is also such a joke that VirtualBox does not seem to see that the processor supports virtualization. To fix this issue, here is what you can do. I will say right away, I'm not sure that this will help you, but it helped some users. It is necessary to disable one component that relates to virtualization, but a little to another, so to speak. Here's how to do it, right-click on Start and select Programs and Features from the menu (the topmost one):


Now look, you will have a list of components, some of them are enabled and some are not. Here is what needs to be done? Here you just need to uncheck a component such as Hyper-V, here it is:

After that, reboot and see if it is possible to install 64-bit Windows. If everything worked out, then you will have such a list, well, that is, it will be possible to install a 64-bit bit:

By the way, there is an opinion on the Internet that VirtualBox is better than VMware, but is it really so? Well, in general, there are not so many disputes on this topic, but enough, but many, as I understand it, do not argue at all, because they are sure that they are right. Well, there is such a thing, I don’t argue either, because I’m sure I’m right .. But I’m sure, because I conducted tests more than once, and in all cases I have VMware (or to be more precise, then free version VMware Player) was always faster than VirtualBox. In terms of convenience, I somehow like VirtualBox more. But if you need to work with a virtual machine often, then here I choose only VMware. Well, it’s so, just a note to you, my opinion would be to say so ..
But I haven’t written something yet, I forgot, this is my jamb, sorry. It may be that your processor supports virtualization (if it is modern, then 95% of what it supports), but there is still no choice of 64-bit Windows. What's the matter? And the thing is that virtualization technology is an option that is enabled or disabled in BIOS. And not all motherboards have this option enabled by default! In general, you need to go into the BIOS (turn on the computer > press the F1, F2, Del buttons for ten seconds, wait for the BIOS, the method works on many hardware) and enable this virtualization there. There something will be written like Virtualization Technology and will be Enabled (enabled) or Desabled (disabled). Something in this style, here is an example, but your design may be different:

I forgot to say something else, in Windows 10 in the manager you can also see if virtualization is enabled or not. On the Performance tab there is such a fad Virtualization, everything is indicated there:

I will also say in a nutshell what virtualization is. This is when the virtual machine can send commands to the processor directly. Well, something like this. Intel has basic virtualization, this is VT-x, and advanced, this is VT-d. VT-x allows you to simply send commands to the processor directly, but VT-d allows you to transfer to virtual machine entire devices on the PCI bus, such as a video card. But as a rule, VT-d comes in more expensive processors. AMD I'm not sure, but most likely there is something similar
Well guys, that's all. I hope that you can still find out the reason why there is no x64 choice in VirtualBox. I think that you will solve this problem, because most likely you have a modern processor that supports this virtualization in hardware. Good luck in life, good mood
10.01.2019
virtual box - special program to create virtual computers in PC memory. Each virtual computer can contain an arbitrary set of virtual devices and a separate operating system. The scope of virtual computers is very wide - from performing software testing functions to creating entire networks that are easy to scale, distribute the load and protect. VirtualBox is free and open source.
System requirements:
Windows Server 2008 (64-bit)
Windows Server 2008 R2 (64-bit)
Windows 7 (32-bit and 64-bit)
Windows 8 (32-bit and 64-bit)
Windows 8.1 (32-bit and 64-bit)
Windows 10 RTM build 10240 (32-bit and 64-bit)
Windows Server 2012 (64-bit)
Windows Server 2012 R2 (64-bit)
Windows Server 2016 (64-bit)
Torrent Virtual PC - VirtualBox 5.2.10.122406 Final + Extension Pack in detail:
There are versions of VirtualBox designed to be installed on almost all operating systems, including Windows, Linux, Macintosh, and OpenSolaris. as a "guest" operating system any operating system can also be used, including Windows (NT 4.0, 2000, XP, Server 2003, Vista, W7), DOS/Windows 3.x, Linux, and OpenBSD.
Key Features:
·VirtualBox can be controlled both through the GUI-interface and through the command line.
· To expand the functions of the program, a special SDK kit has been developed.
·The parameters of virtual machines are described in XML format and do not depend on the physical computer on which the system is running. Therefore, virtual computers of the VirtalBox format are easy to transfer from one PC to another.
When used on "guest" operating systems Windows systems or Linux, you can use special utilities that make it much easier to switch between physical and virtual computers.
·To quickly exchange files between the guest and physical PC, you can create so-called "shared folders" (Shared folders), which are simultaneously available from both of these machines.
VirtualBox allows you to connect USB devices to virtual computers, allowing virtual machines work with them directly.
·VirtualBox fully supports RDP (Remote Desktop Protocol) remote access protocol. The virtual machine can act as an RDP server, allowing you to manage it remotely.
The Extension Pack adds the following features:
The virtual USB 2.0 (EHCI) device.
The virtual USB 3.0 (xHCI) device.
VirtualBox Remote Desktop Protocol (VRDP) support.
Host webcam passthrough.
Intel PXE boot ROM.
·Experimental support for PCI passthrough on Linux hosts.
Disk image encryption with AES algorithm.
·Installation:
Option number 1.
- Launch VirtualBox, go to File » Settings » Plugins and add the downloaded file with the extension .vbox-extpack
Option number 2.
- After installing VirtualBox, double click Oracle_VM_VirtualBox_Extension_Pack.vbox-extpack.
Note: In the event that the file has a green icon or the file was associated during the installation of VirtualBox.
Here you will find links to VirtualBox binaries and its source code.
VirtualBox binaries
By downloading, you agree to the terms and conditions of the respective license.
If you"re looking for the latest VirtualBox 6.0 packages, see VirtualBox 6.0 builds . Please also use version 6.0 if you need to run VMs with software virtualization, as this has been discontinued in 6.1. Version 6.0 will remain supported until July 2020.
If you"re looking for the latest VirtualBox 5.2 packages, see VirtualBox 5.2 builds . Please also use version 5.2 if you still need support for 32-bit hosts, as this has been discontinued in 6.0. Version 5.2 will remain supported until July 2020.
VirtualBox 6.1.4 platform packages
The binaries are released under the terms of the GPL version 2.VirtualBox older builds
The binaries in this section for VirtualBox before version 4.0 are all released under the VirtualBox Personal Use and Evaluation License (PUEL) . As of VirtualBox 4.0, the Extension Pack is released under the VirtualBox Personal Use and Evaluation License and the other packages are released under the terms of the GPL version 2. By downloading, you agree to the terms and conditions of the respective license.
VirtualBox Sources
The virtual box sources are available free of charge under the terms and conditions of the GNU General Public License, Version 2 . By downloading from the links below, you agree to these terms and conditions.
Download VirtualBox - Oracle Virtual Box virtual machine
Oracle VM VirtualBox (Oracle VM VirtualBox) is a software product that allows you to create virtual machines and install various software on them.
The basic version of the Virtual Box program is distributed under the GNU GPL license and, accordingly, there are no restrictions on use, i.e. users can use it both at home and at the enterprise.
Of the main features of the program, it is worth noting its cross-platform and support for 64-bit guest systems, even on 32-bit host systems on which the Virtual Box package is installed.
Oracle VM VirtualBox - how to use
An example of installing the Windows XP operating system on an Oracle VM VirtualBox virtual machine
Launch VirtualBox

Add a virtual machine by simultaneously pressing the Ctrl + N keys, or by clicking on the "Machine" menu item, and in the "Create ..." drop-down menu

Specify the name of the virtual machine, select the type of operating system and its version from the list.

VirtualBox - Selecting the type of guest operating system
Next, specify the volume random access memory available for use by the guest operating system. VirtualBox independently sets the recommended value, but if you decide to change this value, then it is better if it is no more than a third of the amount of RAM installed in your PC. Set the slider within the green sector, otherwise you may experience computer performance issues.

The next step is to create a virtual hard drive for the virtual machine. Here you need to decide how much the installed guest operating system and applications will take, and select the required value.

This completes the creation of the virtual machine and you can start it by clicking on the corresponding “Run” icon in the program menu.

Next, you need to specify the boot CD image, this can be done in two ways. Either a virtual machine that is no longer running by clicking on the "Devices" menu, the item "Optical Drives" and then "Choose a virtual optical drive file ...", or before it starts, by clicking on "Optical Drive" in the "Media" tab and then " Choose a virtual internal drive file…”
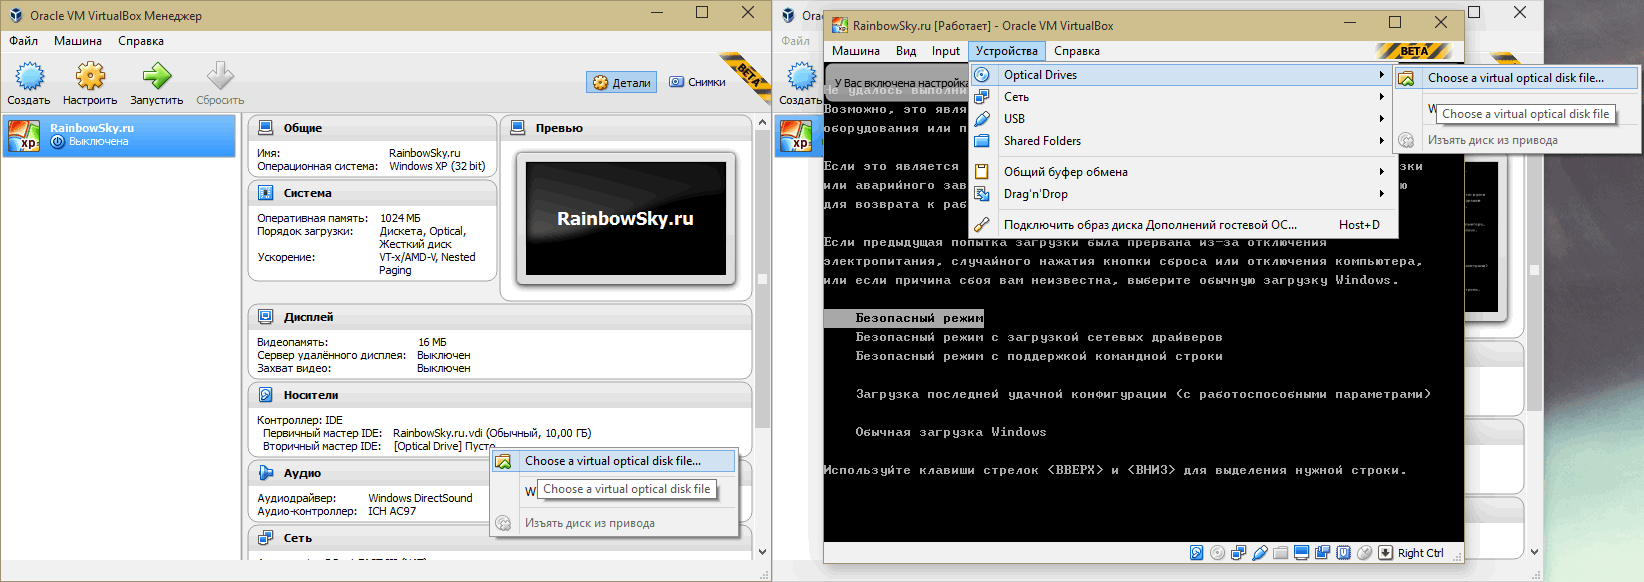
In the dialog box that appears, select the path to the file with the CD image of the required operating system and click "Open"


Upon completion of the installation, you will have a completely normal operating system installed on a virtual machine created using Oracle VM VirtualBox.

Since we all love to experiment, dig into the system settings, run something of our own making, it is necessary to think about a safe place to experiment. Such a place for us will be the VirtualBox virtual machine with installed Windows 7.
When starting the VirtualBox virtual machine (hereinafter referred to as VB), the user sees a window with a completely Russian-language interface.
Recall that when you install the application, the shortcut is automatically placed on the desktop. If this is your first time creating a virtual machine, this article will provide detailed instructions that may be helpful at this stage.
So, in a new window, click "Create", after which you can select the OS name and other attributes. You can choose from all available operating systems.

Go to the next step by clicking Next. Now you need to specify how much RAM to allocate to the VM. For its normal functioning, 512 MB is enough, but you can choose more.

Then we create a virtual HDD. If you have previously created discs, you can use them. However, in the same article, we will focus on how they are created.
We mark the item "Create a new hard drive" and move on to the next steps.


In a new window, you need to specify where the new disk image should be located and how large it is. If you are creating a boot disk containing Windows 7, then 25 GB is enough (this figure is set by default).

As far as placement is concerned, the best solution would be to place the disk outside of the system partition. Failure to do so may result in overload boot disk.
If everything suits, click "Create".
When the disk is created, the parameters of the created VM will be displayed in a new window.
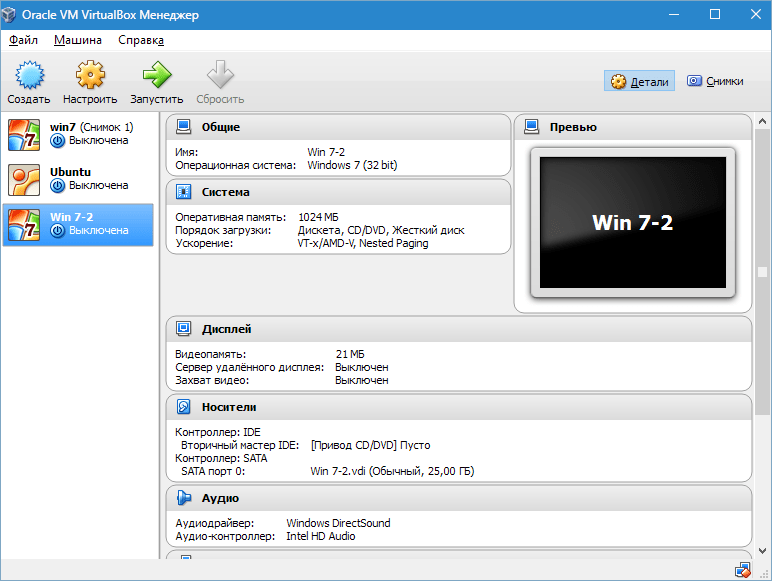
Now you need to configure the hardware of the virtual machine.
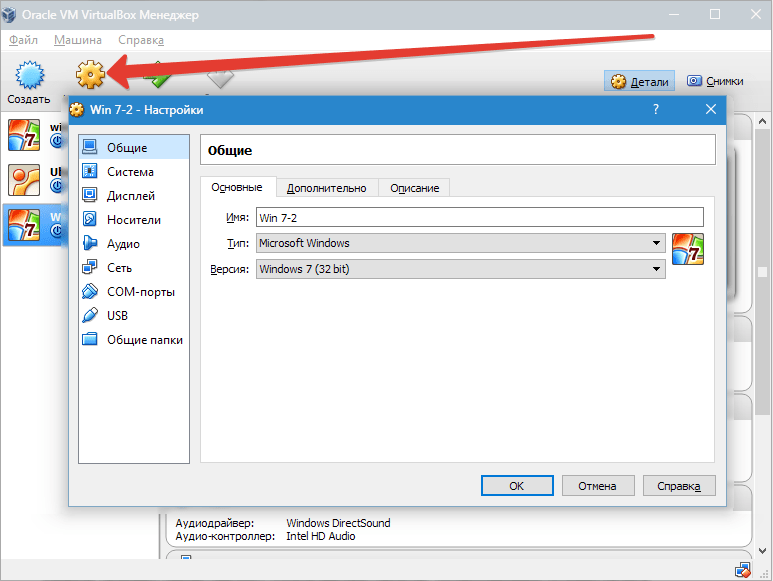
In the "General" section, the 1st tab displays key information about the created machine.
Let's open a tab "Additionally". Here we will see the option "Picture Folder". It is recommended to place the specified folder outside the system partition, since the snapshots are large.
"Shared Clipboard" implies the operation of the clipboard when interacting with your host OS and VM. The buffer can work in 4 modes. In the first mode, the exchange is made only from the guest operating system to the main one, in the second - in the reverse order; the third option allows both directions, and the fourth disables communication. We choose the bidirectional option as the most convenient.
"Mini toolbar" is a small panel that allows you to manage the VM. We recommend activating this console in full-screen mode, since it completely repeats the main menu of the VM working window. The best place for it is at the top of the window, because that way there is no risk of accidentally pressing one of its buttons.

Let's go to the section "System". The first tab offers to make certain settings, which we will discuss below.
1. If necessary, adjust the amount of VM RAM. At the same time, only after its launch it will become completely clear whether the volume is chosen correctly.
When choosing, you should start from the amount of physical memory installed on the computer. If it is equal to 4 GB, then it is recommended to allocate 1 GB for the VM - it will function without "brakes".
2. Let's determine the order of loading. A floppy disk (floppy) player is not needed, turn it off. The first in the list should be assigned a CD / DVD drive in order to be able to install the OS from a disk. Note that this can be either a physical disk or a virtual image.

See the reference section for other settings. They are closely related to the hardware configuration of your computer. If you set settings that are not consistent with it, the VM will not start.
Bookmark "CPU" the user specifies how many cores are on the virtual motherboard. This option will be available if hardware virtualization is supported. AMD-V or VT-x.

Regarding hardware virtualization options AMD-V or VT-x, then before activating them, you need to find out if these functions are supported by the processor and whether they are originally included in BIOS– it often happens that they are disabled.

Now consider the section "Display". Bookmark "Video" indicates the amount of memory of the virtual video card. Activation of two-dimensional and three-dimensional acceleration is also available here. The first of them is desirable to include, and the second parameter is optional.

In chapter "Carriers" all disks of the new virtual machine are displayed. Also here you can see a virtual drive with the inscription "Empty". We will mount the installation image into it. Windows disk 7.

The virtual drive is configured as follows: click on the icon located on the right. A menu opens in which we click "Select Optical Disc Image". The next step is to add the operating system boot disk image.


We will not cover network issues here. Note that the network adapter is initially active, which is a prerequisite for the VM to access the Internet.
On the section COM there is no point in dwelling in detail, since nothing is connected to such ports today.
In chapter USB check both available options.
Let's go to « Shared folders» and select the directories to which the VM is planned to provide access.
The entire setup process is now complete. Now you can start installing the OS.
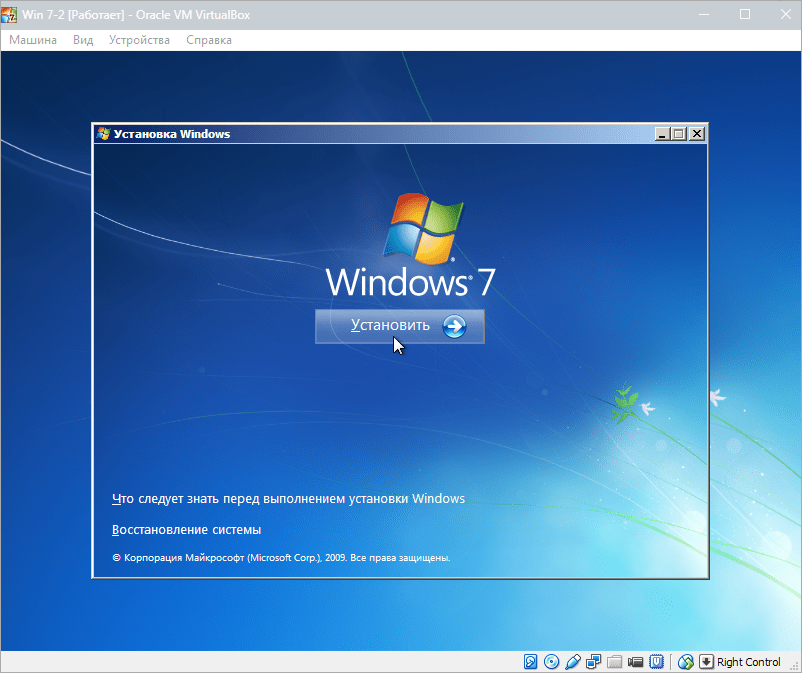
Select the created machine in the list and click "Run". Herself Windows installation 7 on VirtualBox is very similar to a regular Windows installation.
After downloading the installation files, a window with a choice of language will open.

We accept the terms of the license.

Then choose "Full installation".

In the next window, you need to select a disk partition for installing the operating system. We have only one section, so we select it.


During installation, the machine will automatically restart several times. After all reboots, enter the desired username and computer.


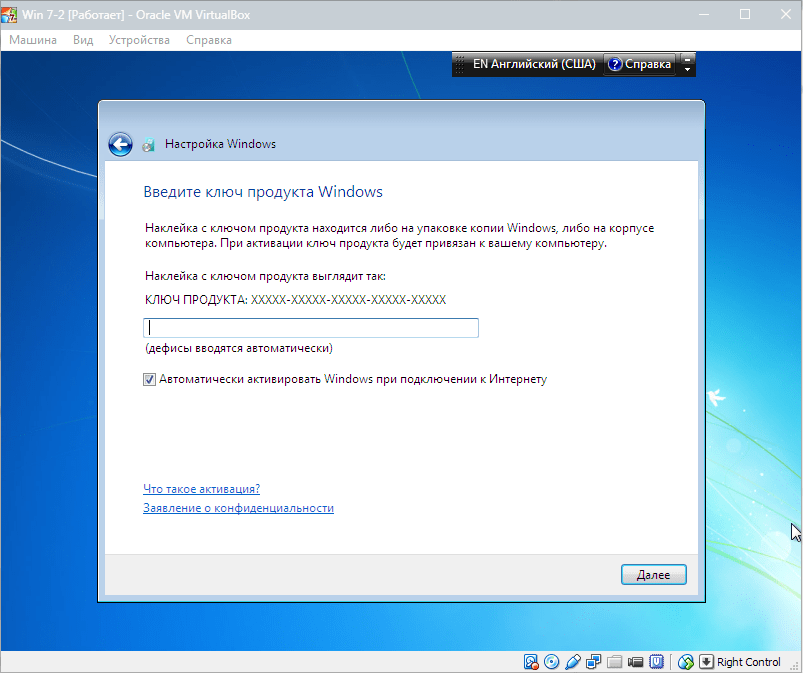
Here we enter the product key, if any. If not, then just click "Further".

Set the timezone and date.

Then we choose which network to attribute our new virtual machine to. Click "Home".

After these steps, the virtual machine will automatically reboot and we will get to the desktop of a freshly installed Windows 7.

Thus, we installed Windows 7 on the VirtualBox virtual machine. Then it will need to be activated, but this is a topic for another article ...