Create a local area network connection windows 7. How to create a local area network between two computers? How to connect computers to each other
This article will help you quickly answer your questions. Also, you can study the material in full to get a complete understanding of the network setup in Windows 7.
Introduction.
Purchasing an operating system Windows 7, the user must be prepared for the fact that sooner or later he will face the task of setting up the network in the operating system. For some, this task is not difficult. Typically, installing and configuring a network in Windows 7 is the next step immediately after installing Windows 7 ( If you haven't installed Windows 7 yet and aren't quite sure what steps to take, then you should read this section: Installing Windows 7).
The network setup step is required for the following post-installation steps:
- downloading actual distributions of anti-virus programs from the Internet;
- loading latest versions video player, web browser;
- if necessary, download drivers for some devices on your computer from the network (if they were not downloaded and installed automatically, or if installation disks absent);
- use of the XBOX console;
- document exchange and quick access to shared resources of multiple computers or laptops. In this case, you need to set up a wired or wireless network in order to use the Internet. As a rule, one computer or laptop serves as a kind of Internet distributor for all other pieces of computer equipment..
The same is true for MAC addresses and subnet masks. All these settings remain the same, they are familiar to users for a long time. Some changes have only affected the interface of the Control Panel and its items, with the help of which the network settings are accessed. Everything else without significant changes. This is another undoubted plus of Windows 7. Users who have previously used Windows XP will be able to understand the new operating system quite easily. Typically, the setting local network in such popular operating systems as Windows Vista, Windows 7, Windows Server 2008/2008 R2, begins with such a component for configuring network properties as "".
This property configuration tool allows the user to select a network location, set up printer and file sharing, and view a network map. You can also monitor the status of all your network connections. It is very convenient and practical.
How and where to open the Network and Sharing Center component.
Before you can use the full functionality to create network settings, you need to find and open it. One of the following actions of your choice will correctly open the active window " Network and Sharing Center»:
As you can see, if you are careful and read everything, then with the search for the "Network and Sharing Center" component, there should not be any problems. It should be noted that in order to expand the ranges of IP addresses used in Windows 7, in addition to the pre-existing IPv4 protocol, a new one was added - IPv6. True, providers have not yet activated it, and when this will happen is currently unknown. Most likely, the creators of Windows 7 played ahead of the curve.  Figure 1. The illustration shows the Network and Sharing Center window.
What is the network location of the computer.
Understand what is network location”, you need even before you start working with this important component. For all computers, this setting is set automatically the first time they connect to the selected network. This also applies to the firewall and security settings of the network selected for connection. All of them are also configured automatically during the first connection of a computer or laptop to the network.
operating room Windows system 7 supports multiple active profiles at the same time. This allows for the most secure use of multiple network adapters that can be connected to different networks.
By the way, Windows Vista uses the most restrictive firewall profile for all network connections. Perhaps that's why Vista isn't as popular as Windows 7.
There are four main types of network location:
| The first type is the home network. From the very name it becomes clear that this network location is intended for a computer that is used at home. It is also used in networks where all users know each other well. Such computers can not only create, but also join home groups. As a rule, for the convenience of users when using home networks, network discovery is turned on automatically. Home networks provide all computers with quality network access. | |
| The second type is a network of an enterprise or organization. This type of network location also allows you to find the network automatically. The difference from a home network is that in an enterprise network, you cannot join or create a computer to a homegroup. The network is intended exclusively for professional activities in an enterprise, organization or office. This type is called abbreviated (SOHO), that is, it is used in a small office network. | |
| The third type is the public network. Cafes, airports, train stations and other public places - this is where computers use the third type of network location. By default, the ability to join homegroups is disabled in this location. Network discovery is also disabled. Without exaggeration, we can say that this is the most strict arrangement. | |
| The fourth type is a domain network. The domain type of the network location is almost no different from the working network. Except that in the domain type, the network discovery and Windows firewall configuration is determined by group policy. This also applies to the network card. In order for an existing network to automatically receive a network location type of "Domain", the computer only needs to be joined to an Active Directory domain. Only in this case the network can become a domain network. |
 Figure 2. Selecting the network location of the computer.
Network map.
In order to see the location of all devices included in a particular local network, a network map is used. This is a graphical representation of the devices included in the network and the scheme by which they are connected to each other.
You can see the network map all in the same "Network and Sharing Center" window. True, only the local part of the network card is displayed here. Its layout is directly dependent on the available network connections. In the upper left corner, you can see the display of the computer on which the map is being created. On the left you can see the display of the remaining computers included in the subnet.
 Figure 3. An example of a network map.
You can view the network map at any time. True, only for locations such as "Home Network" and "Company Network". If the user is curious to view the maps for the "Domain Network" or "Public Network" locations, they will see a message that network message disabled by administrator by default. A network administrator can enable mapping through Group Policy.
In Windows 7, not one, but two components are responsible for the operation of the network map. it Link layer(Link Layer Topology Discover Mapper - LLTD Mapper). It is this important component that queries the network for devices to be included in the map.
Network connections.
In the window " Network connections"You can see the entire set of data that the user needs to connect the computer to the Internet, local network or any other computer from the home network.
This data is available for viewing only after installing all the necessary drivers for each network adapter on Windows 7 and after automatically configuring all network connections on a specific local computer or laptop.
There are several simple and affordable ways with which you can easily and quickly open the " Network connections»:
- Opening the window " Network and Sharing Center"and follow the link" Change adapter settings» (see figure 4);
 Network and Sharing Center""." href="/upload/nastroika-windows-7/windows-7-nastroika-seti-img-7.png">
Figure 4. Opening the window " Network connections" through " Network and Sharing Center».
Network and Sharing Center""." href="/upload/nastroika-windows-7/windows-7-nastroika-seti-img-7.png">
Figure 4. Opening the window " Network connections" through " Network and Sharing Center».
- Click the "Start" button and when the menu opens, enter "View Network Connections" in the search field. In the results found, select the application "View Network Connections" ( very convenient way);
- You can also use the classic keyboard shortcut Win+R. This will open the Run dialog. In the "Open" field, which is located in the "Run" dialog box, you must enter the following command: ncpa.cpl or control network connection. Having done this, you need to click the "OK" button.
 Figure 5. Network Connections window
Window " Network and Sharing Center” similar to the Windows XP window. All detailed information about the network connection can be obtained by selecting the "Properties" option for a specific network adapter (see Figure 6). In Windows 7, to configure the network connection in the "Properties" window, you need to select "Internet Protocol Version 4". In the same window, you can also make the necessary settings for gateways, subnet masks, DNS servers, IP addresses, etc. All this information can be obtained from the provider that provides the Internet access service.
 Figure 6. Network connection details.
Rename the network adapter.
The developers of Windows 7 made sure that operating system by default, it itself assigns the names “Local Area Connection” to all network connections, or another option - “Connection to wireless network". If a user's computer has more than one network connection, the system also assigns a number to the connection. There are three ways to rename the name of any of the connections you have created.
- First way. Select a network connection and click on the "Rename connection" button located on the toolbar. After entering a new name, press the key Enter;
- The second way. With key F2: press, enter a new name and save using the same key Enter;
- The third way. To rename the network connection selected from the list, right-click on it, select the “Rename” command from the context menu that appears, rename and save the changes using the already familiar key Enter;
Network status.
In addition to the ability to rename the connection, you can also check the status of the network in this window. Using this window, which is called “Network Status”, at any time you can not only view any data about the connection network, but also find out details such as MAC address, IP address and many other useful and interesting information.
There are providers that allow users to access the Internet using the MAC address of the network card. If for some reason the network card has been changed or the entire computer has been replaced, the MAC address will also change, and Internet access will stop. For a new Internet connection, you must set the required physical address (MAC address).
How to see the MAC address of a network card in windows 7?
To view the current MAC address, as well as complete information about the connection, you need to right-click on the local network connection, and then select the "Status" item in the opened context menu(See Figure 7). Figure 8. How to change the MAC address of the network card (network adapter).
Network diagnostics.
If you encounter a situation where unexpected errors or failures occur in the operation of your network connection, you can resolve them using connection diagnostics. The diagnostic tool can be found in the Network Connections window.
Select window " Troubleshooting”, which, by analyzing the connection status, offers a choice of possible malfunctions and troubleshooting methods. To start diagnostics, you need to right-click on the network connection and select the "Diagnostics" command in the context menu.
 Figure 9. Opening the Local Area Connection Troubleshooter.
The second way to start checking the network connection parameters is to select the desired network and click on the "Connection Diagnostics" button. The button can be seen on the toolbar.
In the dialog box that opens, to diagnose the connection, just follow the steps of the troubleshooting wizard. Nothing complicated.
Disabling the network device (network adapter).
Sometimes situations arise when network connection problems are not solved using the troubleshooting wizard, but by simply disconnecting the network adapter from the computer. This can easily be done by doing one of the following:
- Select a network connection and click on the "Disconnect network device" button located on the toolbar;
- Right-click on the network connection and select the "Disable" command in the context menu that appears;
Conclusion.
The article details how to configure, connect and diagnose network connections.
If you have any doubts about your own ability to configure and connect the network, then it is better to seek help from specialists, or read the article carefully again.
One of the most important abilities of computers is transmission of information from one car to another. Thanks to this, almost endless possibilities open up for users, which everyone has long known about - entertainment, work, communication, and so on.
Many are well aware of the existence of global and local networks. If we use the first one mainly to transfer information over long distances, then the second one is used to transfer data among a small number of users. In this article, we will take a closer look at the local network, as well as describe its creation and configuration in Windows 7.
General concepts
A local network is a network in which united 2 or more computers, usually located within an apartment or, say, a building. Machines can be connected to each other via network cables or wireless communication channel (usually WiFi).
In order for each individual computer to "see" any other, also connected to the local network, two rules must be observed. Firstly, all machines must be connected to one common communication device - router(it is possible without it - more on that later), which receives information from one computer and transmits it to another. Secondly, each machine must have unique network address. Compliance with these conditions is sufficient to combine many PCs into a simple local area network.
It is also worth knowing that there are two ways (or types) of combining computers - star and ring.
The first involves the use of a router (router, switch, hub - as you prefer) as a communication device (the principle of operation was described above).
Network type " ring» does not require the use of such devices, however, for its operation, each computer must have at least two network cards. Roughly speaking, one of them will play the role of a receiver of information, the other - a sender.

This data will be enough for you to move on to the next part of the article.
Preparatory work
Before setting up a home or office local network, you must first prepare all computers and the communication line for work. If you are using wired router as a communication device, you will need connect network cables from each computer to it. If you are creating a home network using wireless router WiFi, then just connect every machine to it.
Building a home local network like " Ring» will require cable pulling according to the following scheme (for example, 4 computers):
- Connect two cables to computer No. 1 in different sockets of network cards;
- Pull one of the cables to PC No. 2, the second - to PC No. 3;
- Connect the second cable in PC #2 to another free slot on the network card and drop it to PC #4;
- You do the same for PC #3 by connecting it to a free board slot from PC #4.
You may notice that when connecting the type " Ring» Each of the computers is connected by wires to only two neighboring ones. In our case, PC #1 has no cable connection to PC #4.
By the way, setting up a network like " Ring" may be done without wires, that is, via Wi-Fi. However, this will require that each computer can not only “be able” to connect to Wi-Fi, but also have the ability to create a virtual hotspot so that other machines can connect to it. But we will not consider this option.
Setting up Windows
After connecting computers to a network using wires or Wi-Fi, it is necessary to perform certain tasks on each of them. settings, otherwise such a home network simply will not function normally. The whole point of customization is just to give each PC its own unique network address(connection settings will be considered using the example of Windows 7).
Start with any one computer:
- Open in Windows partition « Network and Sharing Center", which can be found in Control panels;

- Look in the list on the left for " Change adapter settings» and go into it;

- The connections that are currently available on your computer will be displayed here;
- Select the connection that will be used to communicate on your home network (if you are using a wired connection, then you will need " LAN connection", if Wi-Fi, then -" Wireless network connection»);

- Right-click on the selected connection, and then select " Properties» to enter the settings;
- You need to find in the list of components the item " Internet protocol version 4", then open it;

- Here you will need to move the switch to the second item " Use the following address...»;
- Enter in the field called "IP address" - 192.168.0.1, then in the field " Subnet mask» - 255.255.255.0;

- Close the settings window by pressing the OK button.
Now, almost the same thing needs to be done for each computer connected to your home network. Differences in one - in the IP address field the value of the last number must be unique. Set, for example, on PC No. 2 the address is 192.168.0.2, on PC No. 3, enter 3 as the last digit, etc. to the very last computer on your home network.
By the way, if you want all computers on the network to be able to access the Internet, then you additionally need to fill in the fields " Main gate" and " DNS server». The gateway and DNS can simultaneously be, for example, the address of your Wi-Fi router if the latter is configured to work in global network. You can also enter the address of a computer connected to the Internet in these fields. In this case, the network settings of the latter should indicate that it allows other machines on the local network to use the Internet connection. But that is another topic.
Something else. When your computer connects to a local network, Windows 7 automatically asks where you would like it to be located. There are 3 options - home network», « Enterprise network" or " public network". Some network functions depend on this choice. windows settings- restrictions or permissions of actions of other machines in a network in relation to yours. We will not paint everything - just choose the first option " home network».
How to check the connection
You can check whether computers “see” each other on the network using standard Windows tools, namely, with the help of command line. To open it:

Do the same on all computers.
Related videos
The principle of creating a local network in any Windows versions(XP, 7, 8, 10) almost nothing is not different. Exceptions are complex multilevel corporate networks where multiple subnets, proxy servers and VPNs are used.
But in this article we will look at how to create home network, without resorting to buying expensive equipment, but using a regular switch or router with Wi-Fi support.
What is needed to create a network
First of all, to create a local network from a certain number of computers, we need equipment:
note: in the event that a direct connection is used (i.e. we insert a twisted pair cable into both devices without using a router), then you will need not a standard cable, but cross— over, unless modern MDI-X enabled NICs are installed. In this case, the standard crimping method can be used.
How to create a local network
Now we proceed directly to the creation. First we need to prepare:
- Install all equipment in its place - computers, routers, etc.
- crimping cable, if necessary.
- Doing wiring, i.e. we stretch the twisted pair cable to the equipment.
- We connect twisted pair equipment.
Costs note that when the connection is made and all devices are running, the connection connectors on the computers should shine. The same applies to routers with routers, only they have light bulbs located on front panel. If any light is off, then the connection is made. not properly.
When the connection is made, you need to configure the network in the operating system.
To start checking working group, for which we go to the properties " my computer". You can not open the properties, but use a combination Win+
R and enter in the window sysdm.
cpl.
On all devices working group must be the same, otherwise the computers will not see each other.
To change the group, just click on the button. change and enter a group name. Name must be entered Latin, and match on all devices. 
Then we look for network icon in the notification area and with its help we get to Network and Sharing Center.
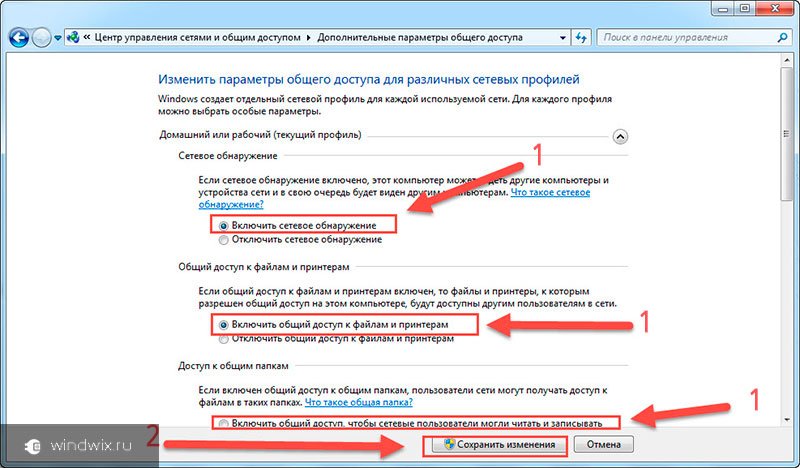
Here we are interested in the link changing advanced options, it's third from the left and will allow you to edit sharing options. For each profile choose: Enable network discovery, autotuning and general access to files and printers. 
Scrolling page and below disable shared access with password protection. All other settings can be left. Click Save changes and exit.
This completes the setup. The network should work, but only if your router distributes dynamic addresses.
If a router was used, or the devices were connected directly with a cable, then a few more settings need to be made.
Network settings
When direct connection or using a router, we need change computer ip addresses. For this necessary:

We will not describe what each setting is responsible for, because. this is a fairly broad topic. It is enough to enter on all computers the addresses that are described above.
After making all the above settings, the network should work. However, do not forget that a firewall or antivirus can completely block the network. Therefore, if nothing worked, check their settings or temporarily disable them altogether.
Local network via WiFi router
Setting up a network through a router is absolutely nothing is not different from what we have described above.
If the device is configured to distribute dynamic addresses, then the addresses do not need to be changed. Well, if IPs static, you will have to use the previous section.
Also, there will be no difference between whether the device is connected by cable or via Wi-Fi, in most routers, the address distribution settings are configured simultaneously and on wireless and on wired connection.
How to make shared folders
After everything is set up, you need to create shared folders to exchange information.

However, this is still not enough. Now on the folder properties window you need to find the tab safety. And then successively press Change – Add.
This article will show you how to share files between two Windows 7 computers. To do this, we will set up a network between the two computers using a LAN connection and share files and folders. For these purposes, you will need a crossover cable (crossover) and two computers with Windows 7.
1. Turn on "Sharing" in Windows 7
You need to enable "Sharing and Network Discovery" on both Windows 7 computers. To do this, go to " Control Panel" > "Network and Internet" > "Network and Sharing Center" > "Edit add. sharing options". In the window that opens for changing sharing settings, enable the following items:
Network discovery
File Sharing
Shared access to shared folders

2. Name the computer and create a workgroup
Click Start, right click on Computer, select Properties. - in the "Computer name, domain name and workgroup settings" section, click "Change settings" - click the "Change" button - enter the name of the computer (computer names must be different)  - enter the name of the workgroup, for example "Home Network" (the workgroup names for both computers must be the same) - after applying all the settings, you will be asked to restart the computer. Click OK to reboot.
3. Assign IP addresses to computers
Open Control Panel > Network and Internet > Network and Sharing Center - Open "Local Area Connection Properties" and select "Internet Protocol Version 4 (TCP/IPv4)"  - click Properties, then select "Use the following IP address" and enter, for example, 192.168.0.1. After entering the IP address, click on the empty Subnet Mask field, and it should be registered automatically.
  - enter the IP address for the second computer, for example 192.168.0.2 (IP addresses must be different)
4. Connect two computers with a crossover cable
After connecting, you should see the computers in "Network and Sharing Center". You are now all set to transfer files between the two computers.
Add-ons
To access a computer by its IP address (for example, 192.168.0.2), you need to enter \\192.168.0.2 in the address bar of the explorer and press Enter. (the same can be entered by pressing Win + R).  To check if there is a connection between computers, run cmd.exe and enter the ping 192.168.0.2 command (on the computer with the address 192.168.0.1). If there will be messages like: "Reply from 192.168.0.2...." - then the connection is established, and if "Request timed out." - then most likely there is no connection between the computers. If a password is not set on the computer (i.e. empty), then when you try to log in over the network, you may receive an error message:
\\COMPUTER is not accessible. You might not have permission to use this network resource. Contact the administrator of this server to find out if you have access permissions.
Logon failure: user account restriction. Possible reasons are blank passwords not allowed, logon hour restrictions, or a policy restriction has been enforced.
Therefore, when setting up a network in Windows 7, do not forget to also set a non-empty password on your computer. If someone asks for a password when entering another computer, then you need:
Enable "Sharing and Network Discovery" on both Windows 7 computers.
To do this, go to "Control Panel" > "Network and Internet" > "Network and Sharing Center" > "Change advanced sharing settings".
At the very bottom "Turn off password protected sharing"
That's all. Thanks for reading the article. I hope it was helpful to you.
Good day, dear readers.
If two computers are used nearby, it is logical to make a Windows 7 LAN connection between them. This is convenient for exchanging files, information, for joint games or using the same equipment. This tool provides additional convenience, as there is no need to constantly use portable memory or exchange data via the Internet, although the speed of the latter today allows you to do this quickly. I will try to tell everything I know about this technology.
So, for starters, it’s worth talking a little about what a LAN connection is. It is a connection between two or more computers. This is done via cable or wireless technology. As mentioned at the beginning, technology allows the exchange of information, and generally helps to speed up the workflow.
Creation( )
We will not dwell on which components are necessary for physical communication. Before directly establishing a connection, you must specify a single workgroup on all devices. To do this, we do a few simple steps:
As mentioned at first, the value must be the same on all devices that will be in the same bundle. In this case, the line " Full name» each equipment is unique.
After that you need to go to Network Control Center". This can be done via Control Panel” or find the connection icon in the tray, and then right-click on it.


increase
In the left part of the window we find the item "". Now we need to enable network discovery and configuration everywhere in automatic mode. In addition, be sure to open public access.

increase
Then we go to All networks". Finding the last point Sharing with password protection where we need to turn it off.
In addition, you need to enable the discovery of individual folders on the computers you want.
As a result, directories from different users should appear in the network environment.
If this does not happen, go to the main menu " Network Control Center” and press “”. Then we do everything according to the prompts.


increase
No icon next to the clock( )
Don't worry right away. Perhaps the corresponding function was simply disabled for some reason.
So, if you have lost the icon near the clock, do the following:

Network not working( )
Every user who has been interacting with other devices in this way for a long time, at least once in his life, has encountered a problem when the connection simply disappears. This can happen for several reasons. The most common are problems with network equipment. In most cases, a simple reboot helps.
Sometimes it is necessary to re-register all the parameters. How to set up a switch or router? To resolve this issue, it is better to contact a specialist, as it often depends on the specifics of use.
Installing a network printer( )
Separately, it should be said about connecting the printer over the network. Believe me, when more than one computer is used in the room, sooner or later it will be necessary to print from each of them. Do not constantly transfer documents from one to another. To do this, you need to make some movements:

How to turn on the device we need on other PCs or laptops? You just need to install it. For this:

At first glance, setting up a network seems like a complicated process. But actually it is not. Of course, there are connections that require special knowledge from a specialist. In fact, if you are not sure of your actions, it is better to contact the master.
I hope the information above has helped you. Subscribe to updates and you will be the first to know the most interesting data regarding Windows work and computer technology in general.